wikiHow is where trusted research and expert knowledge come together. Dan Harmon (author) from Boise, Idaho on October 01, 2012: Thank you Chris. Sandpaper will be used, in 100 or 150 grit, and a small sanding block is handy. 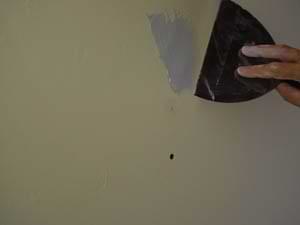 Let it dry before covering with regular drywall mud. Hope this helps someone.
It is worth doing it right the first time. Glenda Taylor, Bob Vila, 11 Ways to Make the Most of Your Towns Curbside Cleanup Day, Cool Tools: An Easier Way to Repair and Finish Drywall, All You Need to Know About Knockdown Texture, The Dos and Donts of Wet Sanding Drywall. Feather out the edges of the swaths well with the knife for a smooth look. Common mistakes that most people make and that I addressed here. Hot mud is primarily used for patching small areas, filling holes, and very quick work as it is plaster based and sets up quickly. If using preformed tape corners, attach them as recommended by the manufacturer, and then smooth mud over the corners, using long vertical strokes on both sides to form a sharp, uniform corner. Unlike paper tape that requires bedding in wet mud, self-adhesive mesh tape is applied over seams and then, when mud is applied, an adequate amount seeps through the mesh into the seam beneath. There are three types of joints to have tape and joint compound applied over them: flat, butt, and corner joints. I've seen newbie applicators using the taping tool, however, and it doesn't look easy to learn. It can be difficult to cover both sides of a corner joint at one time as the knife tends to scrape off the material on one wall while smoothing the joint compound on the other wall. But within that category, youll find all-purpose mud, topping mud, and lightweight, all-purpose mud.. Corner joints to be taped with paper tape must have both sides done at once, and a corner knife is a very useful tool to have for that purpose. The straight edge shows the taper on the finished edge of the drywall.  Mud them as you did the beveled joints, taking care to use only as much mud as necessary to fill the joint and bed the tape. Copyright 2022 Acton Media Inc. All rights reserved. After the skim coat has dried it will need sanding, either with sandpaper or a damp sponge. The different types of tape are paper, mesh, and preformedand all three have their pros and cons.
Anyway as regards filling over the heads, that's a good tip to keep the knife more vertical than flat to stop it flexing. When up apply it, don't let it protrude beyond the surface of the drywall or it will need sanded off before taping. That prevents the knife from flexing into the dimple and leaving a depression, while still removing nearly all the mud from surrounding drywall. Include your email address to get a message when this question is answered. Use pre-creased paper tape for inside corners and preformed tape for outside corners. This is a powder that is mixed with water, and sets up rather than simply drying out - it is a plaster based compound.
It must be not only set up but dry before going over it - don't cover it just because it is hard. @wilderness, Aye, there is certainly room for personal comfort and preference. I'm doing this at the moment with insulated drywall sheets. I use two fingers myself sometimes, especially with wide knives when I have to skim whole walls. If you don't get it now you will have to sand it out before the next application of joint compound or it will leave an uneven surface. First, open the joint compound and, if separated with liquid on top, mix it just enough to mix in any liquid. A razor knife or box cutter can be useful. In addition, few homes are built of masonry, just commercial buildings, and they don't tend to last long before being remodeled. Even if an entire house was to be taped and finished I doubt it would be worth the effort to learn how to use the automatic tools - A skilled experienced taper can tape and apply joint compound to the drywall in a 3 bedroom house in just 2 or 3 hours by hand. Until then, there will always be a nice pile to sweep,mop, or vacuum up and fine film of dust throughout the house whenever it drywall time. ~ John. Any imperfection at all will show up in the final, skim, coat; it is not uncommon to lightly sand the block coat after it is dried to make a superior job. During the mudding process, tape acts as a bond to keep the finished wall from developing cracks along the drywall seams.
After drying the block coat, you are ready to apply the final, skim, coat of joint compound. Look for it in the above video, and you'll be surprised to notice he cleans his knife on the pan after almost every single stroke. The side to be applied to the wall is the outside of the roll, but can also be found by grasping the tape on each side and gently bending it. I'd also like to know what the expert recommendation is on that topic. Do not, however, cover the tape with a thick layer of joint compound; just the minimum to cover the tape. After you've sanded, should anything be done to get the remaining dust off of the wall before you paint? But if dealing with ends that have no beveled indentations, its more challenging to get a smooth finish. Drywall pan is well worth the cost; for the average homeowner a plastic one is much cheaper than stainless steel and works as well. No need to add more tape! Of course, your knife will never be perfectly clean while using it, but one of the major uses of the pan is to regularly wipe the knife, both front and back. Very thorough and well written. I would note a couple extremely basic things that may help someone.
If you decide to take this route, however, be aware that it becomes even more imperative that a very good block coat be applied with an absolute minimum of imperfections, and this is difficult for most homeowners. It is very difficult to apply joint compound to one side of the corner and then the other side without disturbing the first side, although the corner knife may be used again for the block coat. But do be aware that even though you did the "torch test" it is not the same as tangential lighting from a large window on a large wall. The wall is perfectly smooth over the screws, by touch and by a flashlight at an steep angle. Both will do the job quite well, but the fiberglass mesh is a little easier to use. I hope your project goes well this time. Dan Harmon (author) from Boise, Idaho on January 07, 2012: Sorry, John, but I am not paid by anyone to push the hiring of professionals; rather I try to teach people how to do the work themselves. An intermediate approach at perhaps 45 degrees will work the best in the most circumstances. In all cases, the block coat is applied quite thin - 1/16" is too heavy and will probably need sanding, especially on butt joints. Fiberglass applied and ready for joint compound. The order of taping is the same: Do screw indentations and beveled joints first, inside and outside corners next, and butt joints last. 
But I do remember those thingies to screw into a light socket and plug a cord into while still running the light - had to be careful that the cord didn't rest on the hot light bulb. I've been looking at some YouTube videos and some plasterers us a float and hawk to apply second and third coats rather than a wide knife. I forgot to specifically thank you for it in my first comment. Press firmly to create a tight hold. The mud is ready for the paper tape here - note the depth on the penny. If necessary, this step can be done on separate days, doing one side on one day and the other on the next day after the first side as dried. To do a second coat for butt joints, take the 10-inch taping knife, apply two swaths of mud, approximately 8 inches wide, along both sides of the first joint coat, but not on top of the original joint. Take a great deal of care to produce a flawless surface, without ridges, air pockets, or grooves from trash in the mud or on the knife. Using only two coats will make it much harder as a key is to extend that joint very wide. This is a subtle trick to get people to call a professional and pay big bucks for something that you can readily do yourself. When I added a range for a basement renter I disabled the oven so he couldn't blow the main fuse every time they were both cooking. No, we don't put drywall on masonry much.
This is bound to add to the time and time is money. But, there is some question in my head that I need an answer. Drywall tape also comes in two styles; a fiberglass mesh with glue on one side and a paper tape with no glue. Don't make that mistake. In such cases, it is common to use only two coats as the texture hides a lot of imperfections even on the butt joints. Let the wall dry completely and sand before applying the next layer. Sandpaper makes a much bigger mess with dust everywhere, but wet sponging is more difficult to get a good job with. Thanks for the comment, and I'm glad the hub was of some value to you. We are having trouble with small depressions over the screws.
It had at least one outlet in every room and sometimes even 2 in the larger rooms! We refill and sand the holes and paint again - same thing, although a little less. It's not a matter of the job requiring three coats for some mechanical reason; it is purely aesthetic. Yes you will sand it, but only minimally. % of people told us that this article helped them. This article has been viewed 54,949 times. Disclosure: BobVila.com participates in the Amazon Services LLC Associates Program, an affiliate advertising program designed to provide a means for publishers to earn fees by linking to Amazon.com and affiliated sites. Each side will then need one or two more passes to smooth it, followed by a pass or two down the center to remove the ridge that has been left there. i didn't use Spackle tape on a pint and now it's "moving". I have seen a professional apply drywall tape and joint compound to an entire three-bedroom apartment in less than 2 hours, but the average homeowner should expect to spend about 2 hours on a single room. Powdered drywall mud, also called setting mud or hot mud, contains chemicals that react when water is added to hasten hardening time. A skim coat is recommended even when anything but the heaviest texture is to be used.
Everything is allowed to dry thoroughly between coats and excess dust removed. Almost all the joints are between tapered, finished edges and I'm using the mesh, fibreglass adhesive tape. So outlets got added over the years with unsightly surface wiring run in conduit or trunking. You may get tired of working on it, but you will be happy you did in the long run.
Remove all protrusions and any trash that has made its way into your work.
To create this article, volunteer authors worked to edit and improve it over time. "Mushroom" fixings (not sure if there's a proper name for them) are metal wedge type fixings for attaching drywall/insulation slabs to masonry walls. Feather out the edges very well and let the mud dry. If using powdered setting mud, mix as recommended by the manufacturer, beating until smooth with a heavy duty drill fitted with a paddle bit.
My wife would not hesitate to agree there. Apply a third very thin coat of mud after the second coat dries. By signing up you are agreeing to receive emails according to our privacy policy.
Corner joints are those that are in a corner, such as two walls meeting or the wall and ceiling. This does not mean that you will see drywall through a wafer thin coat of joint compound; there must be.
Mudding is a messy process, and splatters can sting if they get in your eyes. I just did a partial bathroom remodel with only two 6" long butt joints (no taper) and it worked fine with two coatsbut I also textured the wall with a spray on texture. Second, why do many drywall workers frown on the idea of using a sponge to wet sand the drywall; after all, does not this dramatically reduce cleanup? You should be left with a screw sized shallow hole filled with joint compound. Thanks a lot. Is there any reason why I can't just use two coats of mud, the first to cover the tape and then a finishing coat? Wipe excess mud from the walls. Most work is done using normal pre-mixed joint compound, and for the most part an all purpose formulation is more than adequate. If the joints are horizontal you will have a much better chance of making it work but even the "flat" joints (tapered edges) are likely to be visible if they are vertical.
Thanks for the info. Several tools are necessary to apply joint compound or tape to drywall. If you use mesh tape on flat joints, note that its not suitable for corners. First, any decent quality straight knives are actually curved just slightly. Use a drywall pole sander or, if its important to keep airborne dust at a minimum, rent a power drywall sander from your local construction rental store. LOL "Modern houses have a double wall of 4" thick concrete blocks". (Electric kettles were probably one of the first, meaning that a stove didn't have to be lit to boil water!) Is it better to scrape as much as possible off the drywall when filling and just leave the hole filled with no spread beyond the perimeter?
With a little time and effort, the average homeowner who is reasonably handy around the home can successfully do the finish work prior to painting. Shone the light at an acute angle from the side and there aren't any shadows so the surface seems to be free of ridges and furrows. Normally there are at least two coats of paint applied (counting primer) and often three; it would be unusual to have a little dust show through that much paint. This type of mud tends to shrink less than all-purpose premixed mud but it begins to harden very quickly. sonfollowers from Alpharetta, GA on March 09, 2012: Good stuff. Most good applicators need very little cleanup behind them anyway, so clean up is minimal. We have tried several brands of primer sealer. Wipe away excess mud with the knife. The more vertical it is, the fewer air pockets will be produced and the smoother the surface, but also the more gouges you will produce with very small movements and changes in the knife. The skim coat is quite thin, just enough to cover what is there and make a minimum depth coat further out. By using our site, you agree to our. Corner joints are best done over two days for the beginner. By educating yourself a bit with a good drywall book (check your local library) you CAN, contrary to what this article states, make your job look just as good as a professional's. Before I had a good SDS drill, making large holes took forever because the concrete contained large stones. Both "taping" and "topping" formulations are available, but I do not recommend them for the homeowner as they are different to work with and have a different feelstick to one formulation so that you can become more familiar with it. Cut and fit a piece of paper tape over the joint while the mud is still wet for a process called bedding. Use the 6-inch taping knife to gently smooth the paper onto the wet mud, working out bubbles as you go. Cut, fold, and fit a strip of pre-creased paper tape in the corner over the wet mud. When finished mudding fasteners, any sanding should be very minimal in order not to scuff the paper. When you begin to apply joint compound, load your knife with about 1/4 of what it. It will easily bend only one way, making a V of the tape; that V is to fit into a corner joint and will tell you which side is to lay on the wall. I feel like I have a good guide and am looking forward to using this info next week.
The question wasn't whether to sponge *instead* of sanding. Used in conjunction with drywall tape, the product is relatively easy to apply, requiring only a small amount of effort. If youre using mesh tape, youll find some tips below that will help you use it correctly. Below ground there is always the dampness to consider (which will degrade drywall) and above ground we put in either steel or wood studs, likely to provide for utilities. Not as hard as you thought. He ended up sanding off nearly an inch of joint compound, using a belt sander to do it, and nearly destroying the drywall underneath. No one I've ever seen likes it, though - it is very difficult to get a job that equals sanding. HubPages is a registered trademark of The Arena Platform, Inc. Other product and company names shown may be trademarks of their respective owners. Joint compound comes in two "flavors"; hot mud and pre-mixed. First, thank you for writing such a powerful post. Dan Harmon (author) from Boise, Idaho on October 28, 2012: You're more than welcome, John. This layer of joint compound should be pressed firmly onto the tape, but not so hard as to leave the tape exposed.
Yes, I pointed out that the homeowner will never have the years of experience to keep up with a professional that can tape an entire home in a couple of hours. To create this article, volunteer authors worked to edit and improve it over time. I'll definitely be using it as a refrence down the road. Smooth the paper tape carefully in the wet mud, using either a 6-inch taping knife or an inside-corner taping tool that features a preformed 90-degree shape for easy bedding.
But when done correctly, the result is a wall so flat that few observers can spot the seams beneath. Here, the goal is to cover the joint while maintaining the minimum crown effect. It is also possible that the difference in surface texture between mud and wallboard is making it look like a depression when it really isn't.