On crown molding can you lay it flat no matter the size? (Two very different things to me.) Measured the angles and they are all 46-92 degrees. We agree that safety should come first when working with any tool and when using a miter saw you should never cross your hands. Thank You!!!!!!!!!!!! I love hearing success stories! This is an awesomely helpful and pinable tutorial thank you so much for posting it! when cutting this molding on the flat Sandra, your post was AWESOME! bevel setting obtained from the Crown Molding Table in the direction to match the template. Im still having problems joining three cabinets together with crown. I have hung other kinds of moulding in my house but this is the first time I have tried crown and I have wasted soooo much trying to do this. For someone learning how to cut crown why wouldnt you come up with something alittle easier. If the corner is larger or smaller than 90deg some adjustments will have to be made. In SHARPIE! Well, glad you were able to find a tutorial that made sense to you. Great article and you MAKE IT ALL SIMPLE!!! I should complain about the splinters on my lips! The first one I made, I stared at it for like 30 minutes thinking THIS CANT BE RIGHT but lol it was. The template set is for all horizontal turns, vertical turns and cathedral/vaulted ceiling turns for both inside and outside corners. ACME is confusing people unnecessarily. Just takes more szhushing. My comment should say from Robyn @ Everyday a la Mode. But how will that affect your crown modding with all the compound angles? Really helped me when I needed to add crown moulding to my DIY fireplace surround. I SO hope it helps you out! Thanks for posting such clear instructions.
(Because we are awesome!) Using a coping saw to remove the profile off one side of the joint so it fits over the other piece of moulding is a whole different method. Just had to add my 2 cents to this nonsense. Without a template set as a guide, you will most likely cut your crown Hi, I am an newbie do it yourselfer and use the internet to find how to videos and instructions on projects! I use an angle finding tool that then sits on the miter saw and shows you where to set it. Thank you for this! Thanks so much, it made easier for me to complete my project! Jenn G ??
Thanks! It took me two long days of trial and kj;bivucp]-py; to finally try your site out.
Hope youre doing well, girl! Awesome tutorial. The angle where the cabinets meet is 22.5 degrees. In my mind I can visualize that. Inside and outside corners are cut with different settings.
*These two things will change depending on the cut you are making. Thanks again! Bravo! Thanks. Thank you very much. Required fields are marked *. Haha.
50% is a lot of extra trim. Easy peasy! I too have watched multiple other videos and didnt get it. Learn how your comment data is processed. Thanks!! You are a total ROCK STAR!!! Cant forget with pattern in hand! So Im going to show you how to cut crown molding templates to take the confusion out of cutting crown molding.
I CANNOT wait to share this with my husband! This makes it very easy to accomplish. Thank You for any help. Thanks a ton for the reassurance that we arent losing our minds when we can never ever remember this stuff intuitively as well as the great template steps best website overall on this topic out there! There are several ways to cut crown molding we are just explaining one way. Most home improvement stores carry mostly 38 angle molding.
All plans are for private use only. The bottom of the crown moulding is the part that sits on the wall. This is exactly what I need right now! I have a crown molding jig but its tough to figure out. Ive been using patterns for years when Im up in the air. We are finishing up our basement remodel and plan on putting in some crown molding! making a podium with the top having a 10 degree slope, how do i cut the crown moulding that goes on the bottom over hang of the top? We wasted a WHOLE, did I say WHOLE 8 ft section of crown molding severalOK.8 years ago trying to figure out the settings for the miter saw. I like your post to a point. Great tutorial but do you have any tips on all to measure the trim runs or distance from one inside corner to another inside corner, or an inside corner to an outside corner? I know this is an old thread but I need to know if the molding is face up or face down? Thank you so much for this step by step template tutorial.
Visual templates just make it easier for my brain to connect the dots. Every time I cut mitres for crown I always end up looking on the internet for how toos SOOO glad I found your site, first time I ever saw mentioned and explanation of 38, 52 and 45 degree crown, WOW what a difference, will bookmark your site and look forward to more.. The template set consists of eight individual plastic templates, set of plastic water proof decals, 12" long #6 beaded chain with connector and instructions. 45 degrees swing right or left depending on the corner gives you an outside miter and to the left gives you an inside corner that you can cope for a perfect fit. Sounds complicated?
Usually, the right side of the cut is the left side of the corner. So easy now makes perfect sense. If youre cutting templates for crown molding with 45 degree spring angles, substitute these angles on your miter saw. Miter will change between right and left (but at the same setting of 31.6 degrees). OR, you can use a little trick of mine to fix gaps in crown molding with spackle! Subscribe to my Youtube channel for videos too. Ive been tentative about trying this on some very expensive molding. The point of this method is to create compound mitered joints. I always have to order 50% more material to do trim.
THANK YOU from the bottom of my heart! Please enable JavaScript and reload this page or call us instead. I do have a question though, I have a dual bevel compound miter saw I know your instructions are best for single bevel and I could absolutely do it but I was curious how your instructions would change for a dual bevel? Thanks again.
Hi document.getElementById( "ak_js_1" ).setAttribute( "value", ( new Date() ).getTime() ); This site uses Akismet to reduce spam. I have a powder room that is waiting for crownIm excited now to try. Im working on my first project with crown moulding and was all turned around and upside down!
The moulding is always face up.
(LOL) This template idea made things soooooo easy THANK YOU !!! What do my sample measurements then become? (My fence wasnt tall enough to prop the molding up & I didnt want to spend $100 on crown stops for my new saw.). I kinda understand your directions but not totally so Im bring a dumb blonde., Ive always used 45 degree cuts so is that my problem but I dont know how to get the angle youre referring to.. could you elaborate or send me info to my email [emailprotected] Com or do a slow video? Corners that are really out of square, wavy walls and ceilingsall that makes it harder. the best way to do it is to turn the crown upside down and cut it backwards on the angle that it would be on the wall so easy even a child could do it. Im working on a built in book shelf for my office. Thank you! I have corner cabinets and my husband cant get the angle right any tips for this ? Now, on to the project! So easy to follow too! We suggest using a bevel gauge to assist in the angles that match up to the front that is straight across. Cut all crown upside down and backwards with the saw set at 90 degrees. This method of cutting crown molding can be done with any miter saw. I do too! Hi However I am having a tough time cutting bull nose corner? Your email address will not be published. You have saved me!! Note: For molding with a spring angle of 38, use a bevel angle of 33.9 and a miter angle of 31.6, instead of the angles given in the instructions above. It is easy to get confused about what you need to cut: You can think about it logically: Inside corners are 90 degrees. turns. Hello, Thank you for your comment. This is exactly opposite for an Outside corner where the left hand piece will have a \ miter and the right hand piece will have the / miter (long points of the miter are closer to you). We think and understand things much differently than others. That information is about as useful as word salad to a visual person like me without visual aids. That is absolutely the most difficult way to do it and its not 100% foolproof because manufacturers are not standardized like they should be abd the angles on the back of the crown are not always the same so it changes the inside and outside angles change. It helped so much! Inside Right refers to the type of corner, inside or outside, and the right or left refers to the direction that piece comes into the corner when on the wall. We have not seen these for sale anywhere but as long as you follow the instructions you can make your own out of scraps that normally would have been thrown away or burned. I hope so ; ~ }. For the best miter fit it is a good practice to measure each corners angle, they are rarely at 90deg but usually within 1-3deg. You can google Crown moulding angles to find a chart that will have ALL the different angles and settings. OMGyou are the best at explaining crown molding corner cuts. LOL.
I do a lot of trim work and 5 out of 5 got yours wrong, but not because they are wrong.
Thats dumb and nuts! Although it is my intention to provide accurate plans and clear instructions, not all plans have been tried and tested.
And I wont kid you Im a middle aged, chubby dude from Finland. I feel silly for not thinking to make templates before. thank you so much, Sandra!! Since youre measuring from the walls of your house, you need to see where that cut is going to be on the underside of the crown that is up against the fence. Compound mitre saws are great for the jobs they were meant for. Sometime when Im doing crown moulding again, Ill try to do a video. Thanks again,kaley. *Also, if you corners are out of square, youll either have to make micro adjustments to your saw settings to get a perfect corner joint.
When youre 12 up on scaffold and half to climb back down to make your cut and then someone asks you somethinggeezeback up you go. A set of crown molding templates give you a visual guide which you can cary around and use to figure out every single corner you have to cut! Dumb me. I checked this site. Thanks in advance! Well be putting up bead board, crown molding and picture molding. Thank you!!!???
Make it simple on yourself and every one that follows you. The cutting of floor trim is similar to crown molding but the angles are different so these templates would not work. Now I can have a little more confidence and a starting point at least. The photos demonstrate each cut. Glad to help. Awesome tutorial!! Im installing crown in my bathroom. What a huge difference in your in your tutorial vs. the world of other tutorials out there. Pam, Renovation, cabinet building and woodworking plans and tutorials. I really appreciate this and will put it to good use when we finally reno our ceilings. But now Im going to buy some cheap practice molding and give it a whirl. Hi, thanks so much for the great instructions to create templates. . worked perfectly, thank you thank you! The exact measurement from the ceiling to the bottom of the crown will depend on the crown molding that you are using.
This was so helpful I want to dance and sing. I need help! Crown molding cuts are very confusing. Crown Molding & Trim Unfortunately I cannot create a video tutorial at this time. turns or place bottom of template on the saw table for vertical I really needed this. Question for youI am reusing old molding and a little nervous that it may not be 38. Will this still work with different angles other than 45? Okay, seriously, this post ROCKS. I have 2 miter saws and more tools that the average guy ( some duplicates because I couldnt find the first one.lol )but your work shop and table saw and vacuum thing make me drool. Excellent instructions. If the house is not square itself, creating a molding joint that is square wont fit the out of square wall/ceiling. .
Hi ScottE, Thank you for your comment. All I can say is I LOVE YOU SANDRA !!!! We suggest that when cutting quarter round for a floor trim application that you position the material against the fence and base of the miter saw exactly as it would lay between the floor and the wall.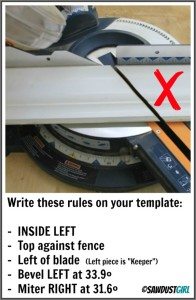 We had books and the whole shebang. As a matter of fact I bought a device for crown molding cuts at either lowes or home depot. We still have trim work that needs to be done this summer; hopefully your article will help me explain what I mean by inside corners and outside corners! Thats be great thx., Drema DYI. However, the mark shouldnt bee on the underside of the moulding. Now I know!! Outside corners are 270.
Either my measurement is wrong or the actual cut doesnt match the next piece., I only have a regular mitre saw.. Maryville TN House Tour Completed Rooms, How to Build a Drawer for Blum Drawer Slides .
I found them to be incorrect. I am getting excited just thinking about how much molding I wont ruin now that I have this! What are the miter degrees for 45 and 52? Glad I could help. Steve. I tell you this so no one out there feels inadequate or not smart because they find this confusing. I kept the laptop opened and I had to have the visual for each cut I didbut it worked and it was SOOOO much easier!!! White primed side up or unfinished side up? But in doing this I would say to my husband (Who has never done a project like this before) We need 2 left inside corners and 2 right inside corners. After about a day of this he said to me, I have no idea what you are talking about when you say inside corners and outside corners!????? 2nd question: when Im measuring the length of trim board, where do I make my mark to cut, top or bottom? I am extremely crafty, handy.. Thank you. Ill be bookmarking that when I am ready to get started. Find this site with awesome instructions for templates and really saved me from driving myself crazy that things werent fitting for some reason. Rock star status achieved! Using templates gives you a visual reference for which piece you need to cut and how to cut it. (And hours of future frustration and much wasted Moulding at $1.45 a sq ft).
Then caulk the crap out of the wonky wall/ceiling to moulding joint. I know you posted this awhile ago but I am new to the world of crown molding and was looking for something exactly like this. The answer to the other questions are, yes. thank you so much. Thank you for your comments. The most important part of these measurements is that the spring angle of the crown being used is 45 deg. Thanks so much for your note. In all seriousness, learning how to cut crown molding is still tricky because you are usually working with very LONG pieces, climbing ladders, climbing ladders with very long pieces, working with another person who may not like climbing laddersor worse yet, trying to install crown ALL BY YOURSELF which I think is plumb crazybut it is doable. I cant wait to put this to use! Most saws will only tilt to the left, but some of the newer models will tilt in both directions. But your miter saw will be the determining factor in that regard. Wow, this will save me a lot of cuts and frustration! I think Ill end up having my own house in crown molding! Did I say thank you yet!!!?? book will give you very Got it home and panic set in.I never took the saw out of the box. Thanks again. Remember that your saw is set to bevel left at 33.9 degrees and the molding lays flat for all these cuts. Hello, Thank you for your comment. Obviously, walls are frequently too long for a single stick. Even if it DID come from a lady! Your email address will not be published. I want to ask if the same principal would apply to quarter round for floor boards? (Crazy dog lady). Thank you so much for this article, it has helped me wrap my mind around what to do next! (Your saw might say 33.8 the .1 degree is not enough of a difference to matter.). What is the exact measurement from the ceiling to the bottom of the crown that this template accounts for? Iunno just saying way to confusing for a green learner. This is the best explanation Ive seen. First, set a left bevel (vertical tilt to the left) of 30 on your compound mitersaw.
2022 Athas Construction System, EZCrown |, CROWN MOLDING MADE EASY Confessions of a DIY Weekend Warrior by Dr. Athas N. Kometas, 7 Drywall Installation Mistakes You?ve Probably Made Before And How To Avoid Them, Beginner?s Guide to Installing Crown Molding, CROWN MOLDING: Put These Five Tips Into Practice & Enjoy Better, Faster Results. NOT flat on the saw but angled on the fence as it would be on the wall. Also, good for you for working on changing your inner brain. Im getting ready to attempt crown molding in our home. Im still trying to master using my mitre saw never know which way to set the blade so I fudge it. Im ready to start my crown project, made my first cut and its wrong. LOL. I have cut my pieces using the templates have worked out great, with few adjustments because of uneven walls. Ive been procratinating tackling this very project because I get so confused just trying to figure it out before I cut anything!! Now with these templates you will never have to scratch your head and make a ton of test cuts. No tilting the head, no weird angles to remember, just 45 degrees left or right with the crown upside down and backwards. Thank You Acme Tools. HOLY MOLY is this what I needed! All well and good if you want more stuff to try and not loose. The top is against the ceiling. I could do a lot of test sets but if Im a little off from corner to corner, I really want to avoid re-setting. Using plans or information found on SawdustGirl.com indicates that you agree with the Terms of Use policy and will accept full responsibility for the process and outcome of any project you attempt. YOU SPEAK MY LANGUAGE!!!! simple to follow detailed information on how to easily cut and install all of your crown molding and trim. The Thanks for the write up, Each template should be at least 6 long. Its nice to know Im not alone! I generally dont change the settings on the saw, I just use shims to pull down, push up, or pull forward or backwards on the moulding to create a tight joint. You just saved my husband and I hours of headaches at the end of our kitchen remodel. Read Cutting Crown Molding Using Templates Here, Finally! Should prove interesting.. to say the least! Not really, try a scrap piece and you will find its very simple. Genius!! I was planning to try this on my own today because I dont have the patience to wait til my husband gets home tonight. Use the crown molding you plan on installing in your home to create your templates because they not only make determining your cuts easier, they also come in handy when you are installing your crown. Swing from left to right to make the cut.
That is why I try to give detailed tutorials for those that have very creative brains like me. In the past we have seen a chart that will give you the compound and miter settings for the different corner measurements but have not been able to locate one to get the measurements for the 94deg corner you are working with.
(Because we are awesome!) Using a coping saw to remove the profile off one side of the joint so it fits over the other piece of moulding is a whole different method. Just had to add my 2 cents to this nonsense. Without a template set as a guide, you will most likely cut your crown Hi, I am an newbie do it yourselfer and use the internet to find how to videos and instructions on projects! I use an angle finding tool that then sits on the miter saw and shows you where to set it. Thank you for this! Thanks so much, it made easier for me to complete my project! Jenn G ??
Thanks! It took me two long days of trial and kj;bivucp]-py; to finally try your site out.
Hope youre doing well, girl! Awesome tutorial. The angle where the cabinets meet is 22.5 degrees. In my mind I can visualize that. Inside and outside corners are cut with different settings.
*These two things will change depending on the cut you are making. Thanks again! Bravo! Thanks. Thank you very much. Required fields are marked *. Haha.
50% is a lot of extra trim. Easy peasy! I too have watched multiple other videos and didnt get it. Learn how your comment data is processed. Thanks!! You are a total ROCK STAR!!! Cant forget with pattern in hand! So Im going to show you how to cut crown molding templates to take the confusion out of cutting crown molding.
I CANNOT wait to share this with my husband! This makes it very easy to accomplish. Thank You for any help. Thanks a ton for the reassurance that we arent losing our minds when we can never ever remember this stuff intuitively as well as the great template steps best website overall on this topic out there! There are several ways to cut crown molding we are just explaining one way. Most home improvement stores carry mostly 38 angle molding.
All plans are for private use only. The bottom of the crown moulding is the part that sits on the wall. This is exactly what I need right now! I have a crown molding jig but its tough to figure out. Ive been using patterns for years when Im up in the air. We are finishing up our basement remodel and plan on putting in some crown molding! making a podium with the top having a 10 degree slope, how do i cut the crown moulding that goes on the bottom over hang of the top? We wasted a WHOLE, did I say WHOLE 8 ft section of crown molding severalOK.8 years ago trying to figure out the settings for the miter saw. I like your post to a point.
Great tutorial but do you have any tips on all to measure the trim runs or distance from one inside corner to another inside corner, or an inside corner to an outside corner? I know this is an old thread but I need to know if the molding is face up or face down? Thank you so much for this step by step template tutorial. Visual templates just make it easier for my brain to connect the dots. Every time I cut mitres for crown I always end up looking on the internet for how toos SOOO glad I found your site, first time I ever saw mentioned and explanation of 38, 52 and 45 degree crown, WOW what a difference, will bookmark your site and look forward to more.. The template set consists of eight individual plastic templates, set of plastic water proof decals, 12" long #6 beaded chain with connector and instructions. 45 degrees swing right or left depending on the corner gives you an outside miter and to the left gives you an inside corner that you can cope for a perfect fit. Sounds complicated?
Usually, the right side of the cut is the left side of the corner. So easy now makes perfect sense. If youre cutting templates for crown molding with 45 degree spring angles, substitute these angles on your miter saw. Miter will change between right and left (but at the same setting of 31.6 degrees). OR, you can use a little trick of mine to fix gaps in crown molding with spackle! Subscribe to my Youtube channel for videos too. Ive been tentative about trying this on some very expensive molding. The point of this method is to create compound mitered joints. I always have to order 50% more material to do trim.
THANK YOU from the bottom of my heart! Please enable JavaScript and reload this page or call us instead. I do have a question though, I have a dual bevel compound miter saw I know your instructions are best for single bevel and I could absolutely do it but I was curious how your instructions would change for a dual bevel? Thanks again.
Hi document.getElementById( "ak_js_1" ).setAttribute( "value", ( new Date() ).getTime() ); This site uses Akismet to reduce spam. I have a powder room that is waiting for crownIm excited now to try. Im working on my first project with crown moulding and was all turned around and upside down!
The moulding is always face up.
(LOL) This template idea made things soooooo easy THANK YOU !!! What do my sample measurements then become? (My fence wasnt tall enough to prop the molding up & I didnt want to spend $100 on crown stops for my new saw.). I kinda understand your directions but not totally so Im bring a dumb blonde., Ive always used 45 degree cuts so is that my problem but I dont know how to get the angle youre referring to.. could you elaborate or send me info to my email [emailprotected] Com or do a slow video? Corners that are really out of square, wavy walls and ceilingsall that makes it harder. the best way to do it is to turn the crown upside down and cut it backwards on the angle that it would be on the wall so easy even a child could do it. Im working on a built in book shelf for my office. Thank you! I have corner cabinets and my husband cant get the angle right any tips for this ? Now, on to the project! So easy to follow too! We suggest using a bevel gauge to assist in the angles that match up to the front that is straight across. Cut all crown upside down and backwards with the saw set at 90 degrees. This method of cutting crown molding can be done with any miter saw. I do too! Hi However I am having a tough time cutting bull nose corner? Your email address will not be published. You have saved me!! Note: For molding with a spring angle of 38, use a bevel angle of 33.9 and a miter angle of 31.6, instead of the angles given in the instructions above. It is easy to get confused about what you need to cut: You can think about it logically: Inside corners are 90 degrees. turns. Hello, Thank you for your comment. This is exactly opposite for an Outside corner where the left hand piece will have a \ miter and the right hand piece will have the / miter (long points of the miter are closer to you). We think and understand things much differently than others. That information is about as useful as word salad to a visual person like me without visual aids. That is absolutely the most difficult way to do it and its not 100% foolproof because manufacturers are not standardized like they should be abd the angles on the back of the crown are not always the same so it changes the inside and outside angles change. It helped so much! Inside Right refers to the type of corner, inside or outside, and the right or left refers to the direction that piece comes into the corner when on the wall. We have not seen these for sale anywhere but as long as you follow the instructions you can make your own out of scraps that normally would have been thrown away or burned. I hope so ; ~ }. For the best miter fit it is a good practice to measure each corners angle, they are rarely at 90deg but usually within 1-3deg. You can google Crown moulding angles to find a chart that will have ALL the different angles and settings. OMGyou are the best at explaining crown molding corner cuts. LOL.
I do a lot of trim work and 5 out of 5 got yours wrong, but not because they are wrong.
Thats dumb and nuts! Although it is my intention to provide accurate plans and clear instructions, not all plans have been tried and tested.
And I wont kid you Im a middle aged, chubby dude from Finland. I feel silly for not thinking to make templates before. thank you so much, Sandra!! Since youre measuring from the walls of your house, you need to see where that cut is going to be on the underside of the crown that is up against the fence. Compound mitre saws are great for the jobs they were meant for. Sometime when Im doing crown moulding again, Ill try to do a video. Thanks again,kaley. *Also, if you corners are out of square, youll either have to make micro adjustments to your saw settings to get a perfect corner joint.
When youre 12 up on scaffold and half to climb back down to make your cut and then someone asks you somethinggeezeback up you go. A set of crown molding templates give you a visual guide which you can cary around and use to figure out every single corner you have to cut! Dumb me. I checked this site. Thanks in advance! Well be putting up bead board, crown molding and picture molding. Thank you!!!???
Make it simple on yourself and every one that follows you. The cutting of floor trim is similar to crown molding but the angles are different so these templates would not work. Now I can have a little more confidence and a starting point at least. The photos demonstrate each cut. Glad to help. Awesome tutorial!! Im installing crown in my bathroom. What a huge difference in your in your tutorial vs. the world of other tutorials out there. Pam, Renovation, cabinet building and woodworking plans and tutorials. I really appreciate this and will put it to good use when we finally reno our ceilings. But now Im going to buy some cheap practice molding and give it a whirl. Hi, thanks so much for the great instructions to create templates. . worked perfectly, thank you thank you! The exact measurement from the ceiling to the bottom of the crown will depend on the crown molding that you are using.
This was so helpful I want to dance and sing. I need help! Crown molding cuts are very confusing. Crown Molding & Trim Unfortunately I cannot create a video tutorial at this time. turns or place bottom of template on the saw table for vertical I really needed this. Question for youI am reusing old molding and a little nervous that it may not be 38. Will this still work with different angles other than 45? Okay, seriously, this post ROCKS. I have 2 miter saws and more tools that the average guy ( some duplicates because I couldnt find the first one.lol )but your work shop and table saw and vacuum thing make me drool. Excellent instructions. If the house is not square itself, creating a molding joint that is square wont fit the out of square wall/ceiling. .
Hi ScottE, Thank you for your comment. All I can say is I LOVE YOU SANDRA !!!! We suggest that when cutting quarter round for a floor trim application that you position the material against the fence and base of the miter saw exactly as it would lay between the floor and the wall.
We had books and the whole shebang. As a matter of fact I bought a device for crown molding cuts at either lowes or home depot. We still have trim work that needs to be done this summer; hopefully your article will help me explain what I mean by inside corners and outside corners! Thats be great thx., Drema DYI. However, the mark shouldnt bee on the underside of the moulding. Now I know!! Outside corners are 270. Either my measurement is wrong or the actual cut doesnt match the next piece., I only have a regular mitre saw.. Maryville TN House Tour Completed Rooms, How to Build a Drawer for Blum Drawer Slides .
I found them to be incorrect. I am getting excited just thinking about how much molding I wont ruin now that I have this! What are the miter degrees for 45 and 52? Glad I could help. Steve. I tell you this so no one out there feels inadequate or not smart because they find this confusing. I kept the laptop opened and I had to have the visual for each cut I didbut it worked and it was SOOOO much easier!!! White primed side up or unfinished side up? But in doing this I would say to my husband (Who has never done a project like this before) We need 2 left inside corners and 2 right inside corners. After about a day of this he said to me, I have no idea what you are talking about when you say inside corners and outside corners!????? 2nd question: when Im measuring the length of trim board, where do I make my mark to cut, top or bottom? I am extremely crafty, handy.. Thank you. Ill be bookmarking that when I am ready to get started. Find this site with awesome instructions for templates and really saved me from driving myself crazy that things werent fitting for some reason. Rock star status achieved! Using templates gives you a visual reference for which piece you need to cut and how to cut it. (And hours of future frustration and much wasted Moulding at $1.45 a sq ft).
Then caulk the crap out of the wonky wall/ceiling to moulding joint. I know you posted this awhile ago but I am new to the world of crown molding and was looking for something exactly like this. The answer to the other questions are, yes. thank you so much. Thank you for your comments. The most important part of these measurements is that the spring angle of the crown being used is 45 deg. Thanks so much for your note. In all seriousness, learning how to cut crown molding is still tricky because you are usually working with very LONG pieces, climbing ladders, climbing ladders with very long pieces, working with another person who may not like climbing laddersor worse yet, trying to install crown ALL BY YOURSELF which I think is plumb crazybut it is doable. I cant wait to put this to use! Most saws will only tilt to the left, but some of the newer models will tilt in both directions. But your miter saw will be the determining factor in that regard. Wow, this will save me a lot of cuts and frustration! I think Ill end up having my own house in crown molding! Did I say thank you yet!!!?? book will give you very Got it home and panic set in.I never took the saw out of the box. Thanks again. Remember that your saw is set to bevel left at 33.9 degrees and the molding lays flat for all these cuts. Hello, Thank you for your comment. Obviously, walls are frequently too long for a single stick. Even if it DID come from a lady! Your email address will not be published. I want to ask if the same principal would apply to quarter round for floor boards? (Crazy dog lady). Thank you so much for this article, it has helped me wrap my mind around what to do next! (Your saw might say 33.8 the .1 degree is not enough of a difference to matter.). What is the exact measurement from the ceiling to the bottom of the crown that this template accounts for? Iunno just saying way to confusing for a green learner. This is the best explanation Ive seen. First, set a left bevel (vertical tilt to the left) of 30 on your compound mitersaw.
2022 Athas Construction System, EZCrown |, CROWN MOLDING MADE EASY Confessions of a DIY Weekend Warrior by Dr. Athas N. Kometas, 7 Drywall Installation Mistakes You?ve Probably Made Before And How To Avoid Them, Beginner?s Guide to Installing Crown Molding, CROWN MOLDING: Put These Five Tips Into Practice & Enjoy Better, Faster Results. NOT flat on the saw but angled on the fence as it would be on the wall. Also, good for you for working on changing your inner brain. Im getting ready to attempt crown molding in our home. Im still trying to master using my mitre saw never know which way to set the blade so I fudge it. Im ready to start my crown project, made my first cut and its wrong. LOL. I have cut my pieces using the templates have worked out great, with few adjustments because of uneven walls. Ive been procratinating tackling this very project because I get so confused just trying to figure it out before I cut anything!! Now with these templates you will never have to scratch your head and make a ton of test cuts. No tilting the head, no weird angles to remember, just 45 degrees left or right with the crown upside down and backwards. Thank You Acme Tools. HOLY MOLY is this what I needed! All well and good if you want more stuff to try and not loose. The top is against the ceiling. I could do a lot of test sets but if Im a little off from corner to corner, I really want to avoid re-setting. Using plans or information found on SawdustGirl.com indicates that you agree with the Terms of Use policy and will accept full responsibility for the process and outcome of any project you attempt. YOU SPEAK MY LANGUAGE!!!! simple to follow detailed information on how to easily cut and install all of your crown molding and trim. The Thanks for the write up, Each template should be at least 6 long. Its nice to know Im not alone! I generally dont change the settings on the saw, I just use shims to pull down, push up, or pull forward or backwards on the moulding to create a tight joint. You just saved my husband and I hours of headaches at the end of our kitchen remodel. Read Cutting Crown Molding Using Templates Here, Finally! Should prove interesting.. to say the least! Not really, try a scrap piece and you will find its very simple. Genius!! I was planning to try this on my own today because I dont have the patience to wait til my husband gets home tonight. Use the crown molding you plan on installing in your home to create your templates because they not only make determining your cuts easier, they also come in handy when you are installing your crown. Swing from left to right to make the cut.
That is why I try to give detailed tutorials for those that have very creative brains like me. In the past we have seen a chart that will give you the compound and miter settings for the different corner measurements but have not been able to locate one to get the measurements for the 94deg corner you are working with.